
After fitting the scuttle and dashboard it was time to tackle the wiring. However, before I started stripping the wiring loom apart, the manual recommends that you do a ‘proof of concept‘ first engine start of the car to make sure everything works. This is a great idea to test that the engine still works having stripped it down and rebuilt it and also checks that fuel lines are correct and everything is working. The only issue is there is absolutely no guidance from MK on how to do this in the manual, so we were in full on ‘make it up as we go along‘ mode. For this task I had my Dad down for a couple of days to help me out. This is what we did.
Engine & Gearbox Oil
The first thing we did was fill the engine, gearbox and diff with oil to finally finish off the rebuild of all the critical automotive components.
For the gearbox and rear differential we used the recomended oils from BOFI Racing. They really know there stuff with anything MX5 related so it seemed a sensible option for me!
https://bofiracing.co.uk/blog/what-gearbox-and-differential-oil-should-i-use-in-my-mx5/
For the Engine Oil I chose the Millers Competition Fully Synthetic 10W 40 which is also recomended by BOFI.

Along with the new engine oil we also added a new OEM Mazda oil filter and new sump plug. The differential oil change also included new drain and fill plugs. We just followed the fill directions as per the Haynes Manual, which was straight forward. I used a large oil syringe to help fill both the gearbox and differential.
Exhaust Header Hole
Before we could start the car we needed to fit at least the exhaust header and first bend of the exhaust to the engine to push the exhaust gases out of the engine bay. Both my sons said to me it was an absolute must that we started the car for the first time without the full exhaust on to make it as loud as possible! I couldn’t argue with this logic!
Exhaust Header Painting
I had already cleaned and painted the exhaust headers to make them look new. For this I submerged the header in citric acid for 24hrs to help remove the rust and carbon build up. I then jet washed the header to remove any debris. Finally after the header was dry I painted it with extreme high temperature (650degC) satin paint. I’m quite pleased with the results!


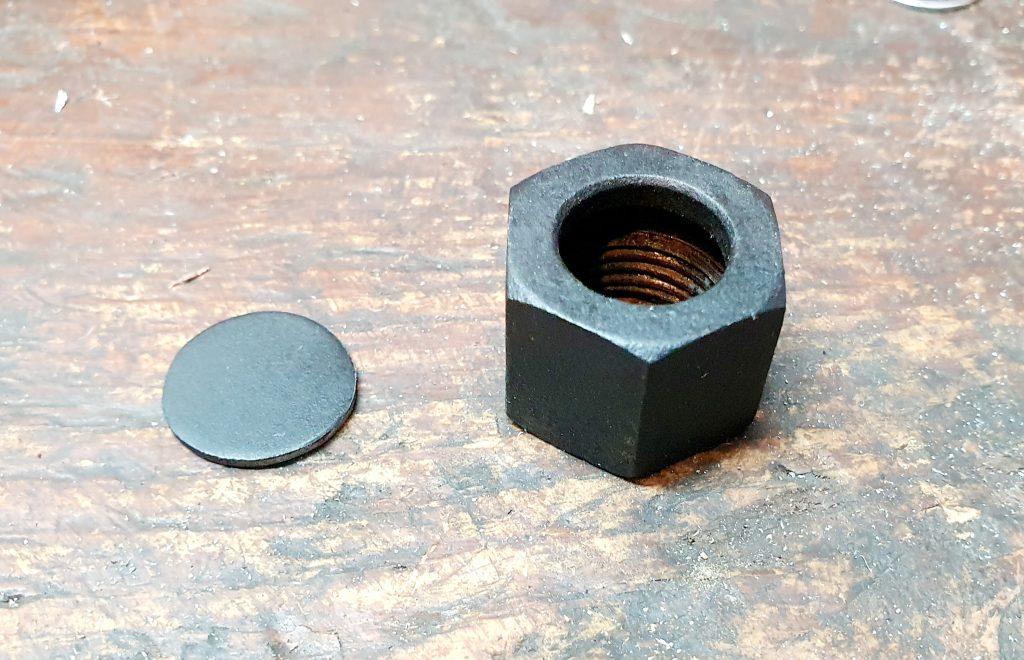

I also blanked off the EGR link by using the original nut cut off the pipe and a circular piece of 1mm aluminium wedged in to seal it off. Painted in the same black.
Fitting the Exhaust Header
My Dad had machined the face of the first bend of the exhaust to better mate with the header. The quality of the finish for the first bend was not brilliant and was not a flat mating surface, which wouldn’t have provided a very good seal.

I soon discovered that you can’t fit the exhaust header and first bend without cutting the hole in the side panel first.
So, I measured the exhaust hole outlet carefully in accordance with manual dimensions and marked it up in masking tape. I decided to use a round hole rather than the square hole suggested in the manual. This in my opioion would look neater. I then drilled a small pilot hole and offered up the exhaust header close enough to check it was roughly in the right location. I then proceeded to cut the hole through the bodywork with a large XXmm hole saw. This was just bigger than the exhaust pipe so I could always adjust and make a bit bigger still if it wasn’t in the right location.


At it was the hole was almost in the right place., the height of the exhaust was too low compared to the hole. Looking at why this was the case it confirmed my previous thoughts that the engine mounts are too low. I was using the 35mm standard mounts that come with the kit. After doing a bit of measuring a mocking up I worked out that the 52mm engine mounts (that MK also sell) would actually be a better height for not only the exhaust outlet but also improved the clearance underneath for the sump (even when shortened). With the larger mounts it still has sufficient clearance for the bonnet as well. For the moment we just packed up the engine mounts higher to allow better clearance for the exhaust in the hole that we had cut.
Preparing the Harness
We got the MX5 harness out and laid it on the ground and marvelled at the sheer amount of cables and connectors. I forgotten how big the wiring loom was. How in earth was all of this going to eventually fit neatly under the bonnet of the car?

To make it easier to see what we were doing and to give us more room for the bird nest of cable we removed the scuttle again and removed the clocks from the dash.
We loosely laid the harness in the different sections over the car and ran the rear harness down the center of the car to the fuel tank area.
Earthing the Harness
The first focus was to try and provide sufficient earth’s for everything. Now for this purpose nothing had to be permanent or pretty, it just had to work. So my strategy was simple:
- Earth the battery to the chassis.
- Earth the engine to the chassis.
- Earth rear harness to brake line t-piece chassis mount.
- Group all other harness earth’s together near the front and earth back to battery directly.
Earth Battery to Chassis
I decided the best place to put the battery was on the passenger side floor. Then use the bottom seat belt bolt point on the chassis as the earth point. Using a random right angled plate I found with a hole in it from the MX5 strip – yes some of the random spare stuff I kept did come in handy! I bolted this through the chassis with a cut down old seat belt bolt. Then drilled a hole in this plate and bolted the battery earth cable to it with a M8 bolt.


Earth Engine to Chassis
For this I figured it would be best to come up with a semi permanent solution as it needed to be done anyway. I decided a good earth point on the chassis near the engine was the engine mount bracket. These are 10mm threads and I only could get hold of M8 crimped eyelets locally so I used them and filed them out as there was sufficient material. I used an eyelet crimp in both ends of some spare earth cable from the harness. One end connecting to the side of the engine block and the other end connecting to the engine mount brackets. This was after exposing the bare metal and using some vaseline to ensure good connectivity and stop corrosion.


Earth Rear Harness
The rear harness was easy to earth as there is already a small earth eyelet which fits nicely into the M6 blot used to secure the rear brake pipes t-piece connector.

All Other Earths
Mazda use a multi earth point strategy where there are about 5-6 earth blocks bolted to the chassis. So I just grouped them together and put a single M8 bolt through them all to join them all together. I then used a jump lead to connect that block back to the battery earth terminal.
This looked messy but was effective and it worked well.

Connect Up Harness Connectors
We then carefully plugged in as many of the connectors that we could. The keys ones are:
- All engine wiring loom connectors on the engine including starter motor and alternator.
- Transmission conmectors
- Fuel Pump connector – rear harness
- Steering column connectors.
- Instrument panel / clocks


Pre-Start Checks
Now I decided to not fill the coolant up for the first start. I didn’t need to run it for long and I knew the coolant pipes would have to come off again to allow me to get access to sort the wiring.
Once we were happy that everything was plugged in and earthed OK, I then wanted to check the starter circuit to see if the engine would turn over before we filled it with fuel.
So, we plugged in the battery and checked that in first ignition position that we had power to the instrument panel. So far so good!
Before trying to crank the engine I used a socket on the bottom end of the engine to hand turn the engine. This was to make sure it was free, having sat there for a long time and not it finally having fresh oil. This was also all OK.
So, without fuel I then tried the start the car to check the starter motor was working and cranking OK. This also was good news!
Starting First Time
Right, the moment of truth, would the engine start 3-years after the last time it was running? So, my boys helped to fill the fuel tank for the first time with Premium Unleaded E5 – only the best for this car!
I tried to start the car and it cranked well, but was cranking and cranking without the engine actually starting… Now I knew the fuel lines were all empty so was expecting this to take a longer crank than normal but this seemed too long. I was just about to give up and the engine spluttered! A bit more cranking and the engine fired into life! A couple of satisfying revs later and I turned the ignition off before it got too hot. Mission success!
There was a worrying amount of smoke coming from the exhaust header! I realised this was the high temp paint on the header burning off a bit with the heat.
What a satisfying success and a key milestone! It proved I had rebuilt the engine correctly, that I’d plumbed in the fuel lines correctly and that the wiring harness still worked OK!
Now onto the next more challenging part, sorting out the wiring harness…
Summary of Build Costs and Hours
Here is a summary of the costs and person hours (total number of hours for every person that has helped) for the build so far. This should hopefully help others with the planning of their builds, by providing cost and time actually incurred for this build. A more detailed breakdown of all the costs and hours worked on the build to date can be viewed here.
| Person Hours Worked This Post | |
|---|---|
| Engine Oil, Gearbox Oil and Diff Oil Fill (2 people) | 1 hrs |
| Clean and Paint Exhaust Header | 1 hrs |
| Prep for engine start and first start (2 people) | 8 hrs |
| Car Build Costs This Post | |
|---|---|
| Engine Oil Millers Competition Fully Synthetic 10W-40 5L | £42 |
| Transmission Oil Mix Part 1 - Red Line MT90 75w-90 GL4 | £24 |
| Transmission Oil Mix 2 - Red Line Lightweight Shockproof 75w-140 GL5 | £26 |
| Differential Oil - Red Line 75W-90 GL5 | £24 |
| E-TECH Extremely High Temperature Spray Paint - Black | £12 |
| Exhaust Header Gasket | £14 |
| Totals | This Post | To Date | All Posts |
|---|---|---|---|
| Person Hours Worked | 10 hrs | 419 hrs | 500 hrs |
| Car Build | £142 | £13,377 | £13,956 |
| Tools / Consumables | £0 | £470 | £470 |
| Total Cost | £142 | £13,847 | £14,426 |
