I’ve finally bought a Donor Vehicle for my MK Sportcars Indy RX-5 kit car build. The MK Indy RX-5 is a single donor kit based on the Mazda MX5/ Miata (US). I have done quite a lot of research to find the right vehicle. So I thought I would share what I have found along the way to help other builders in buying the right donor vehicle for the MK Indy RX-5. If anyone has anything to add that I have missed, or notices anything that is wrong then add a comment to the post below.
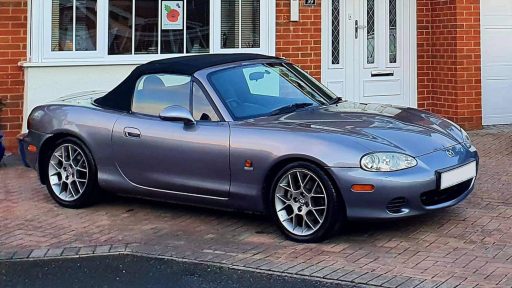
I have just bought a Mazda MX5 Mk2.5 (NB-FL) Euphonic which I paid £700 in November 2020. It might look good on the surface but what you can’t see in this photo is the rust starting to bubble on the rear sills underneath!
The Mazda MX5 Donor Vehicle Options
The MK Indy RX-5 has been designed around the Mazda MX5/ Miata NB Mk2. However, NB-FL Mk2.5s and I believe Mk1s have successfully been used as donor vehicles for the RX-5 with minimal modifications to the build. Currently, the MX5 Mk3 and newer models cannot be used in the RX-5 chassis, as the newer engine (by Ford) and gearbox are completely different and are larger. I’m going to focus on the Mk2 and Mk2.5 in this post and the differences that may affect your build.
Mazda MX5 Mk2 (NB)
The MX5 NB was manufactured between 1998 and 2000 only before the facelift (NB-FL) version came in 2001 – see next section.
Engine
There are both 1.6l (B6-ZE) and 1.8l (BP-4W) engines available in this period. These are the non Variable Valve Timing (VVT) versions which you can tell visibly by the symmetrical front to the valve cover. The 1.8l is the one you are after for the RX-5 with 140bhp as standard.
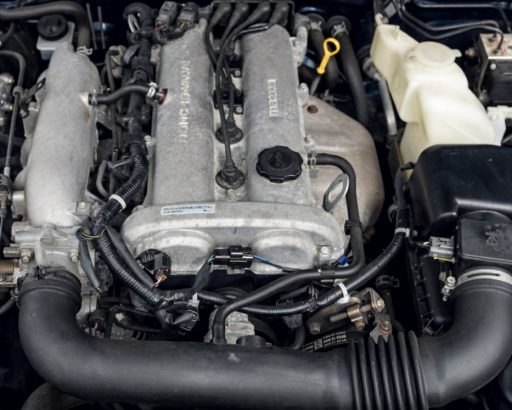
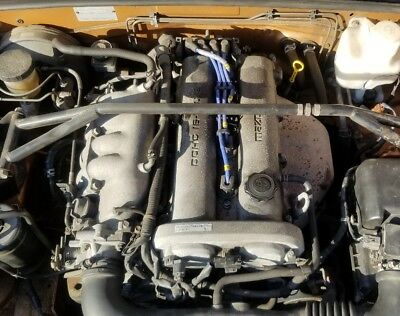
Both 1.6l and 1.8l engines look very similar, but the visual clue is by looking at the air intake manifold on the left-hand side of both images. The 1.6l is a slimmer looking and more vertical mounted inlet manifold. You can see on the 1.8l the 4 raised elements in the casting and it is tilted more to the right.
Gearbox
Most of the Mk2s are 5-speed. There was an exclusive 10th Anniversary Edition (10AE) that had a 6-speed in 1999 and the sports versions had 6-speed. There are also a few automatic vehicles out there, so make sure you check it is a manual.
Differential
Most are open diff but the Sports version and the 10AE came with a torsion Limited Slip Differential (LSD).
Brakes
Disks all round with 255mm on the Front and 250mm on the Rear. The sports versions and special editions came with larger brakes with 270mm on the Front and 276mm on the Rear. These larger sports brakes became the new standard brakes on the Mk2.5. The standard (non-sport) disks are smaller disks than the Mk2.5 but these standard disks will fit with both 15″ and 13″ rims for your Indy RX-5.
Electrics
You can follow the current MK Indy build manual step by step as it is designed around the Mk2 wiring loom.
Fuel System
The current MK Indy build manual is designed around the Mk2 fuel system. So you can follow it step by step and you shouldn’t have any problems. The Mk2 has a return fuel system with a pressure regulator on the fuel rail which is vacuum referenced so the pressure in the fuel rail changes depending on the manifold pressure. This is a good setup if you want to go turbo later on.
Mazda MX5 Mk2.5 (NB-FL)
The MX5 Mk2 facelift (NB-FL) or more commonly known as the Mk2.5 was made between 2001 and 2005. It is based on the Mk2 with various updates, a lot of which were cosmetic which won’t affect your build. I have focused here on the main differences between the Mk2 and Mk2.5 that may affect your build.
Engine
There was still the option for 1.6l or 1.8l but the majority of cars in these years are 1.8l. The 1.8l (BP-Z3) engine was upgraded to include VVT which added another 6bhp (146bhp).
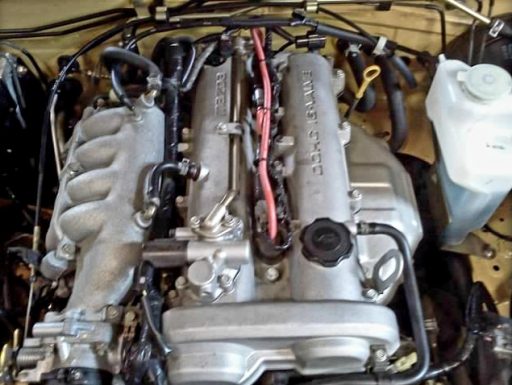
You can tell it is a VVT engine visually by the non-symmetrical front to the valve cover. The left-hand inlet side has a much larger bulge at the front compared to the right. There is also no cam sensor sticking out the front of the valve cover, it is now on top closer to the firewall. Also, there is a metal pipe coming out of the top of the valve cover on the VVT that isn’t there on non-VVT.
Gearbox
Most of the Mk2.5 are 5-speed gearboxes like the Mk2. There are some with 6-speeds on the sports versions and special editions and there are some automatics. The SVT and many of the special editions came with 6-speeds. My Euphonic comes with the standard 5-speed.
Differential
Most are open diff but the SVT and some of the special editions came with LSD. My Euphonic has an LSD, which is a nice additional extra. If you can get an LSD it is well worth it as it will make a big difference to the handling of the MK Indy.
Brakes
Disks all-round with 270mm on the Front and 276mm on the Rear. The Mk2.5 cars had larger disks as standard when compared to the Mk2. From the research I’ve done this is definitely the case from 2003 onwards, but there is a chance that some of the 2001/02 cars had standard brakes as per Mk2. The sport versions and special editions definitely all had the larger brakes no mater what year. This is a good thing if you want to use the standard brakes and run 15″ rims. It is not so good if you want to run 13″ rims as the standard Mk2.5 brakes won’t fit as there is not enough clearance. So you would either need to upgrade to something like the Wilwood callipers (a common choice) or run 15″ rims.
Electrics
If you plan to use the existing loom from the MX5 then there are some deviations from the build manual with the Mk2.5 loom you will have to take into account. Neil at MK Sportscars is the font of all wiring knowledge and knows these looms like the back of his hand. He can advise on the deviations and what you need to do if you are using the standard Mk2.5 loom. Alternatively, MK now does a full plug-and-play wiring loom that works for the RX-5 that takes away any stress in this area. Personally, as an electronic engineer, I’m looking forward to the challenge of adapting the standard loom!
Fuel System
The Mk2.5 fuel system is a returnless system and has a pressure regulator in the fuel tank instead of on the fuel rail. The pressure in the fuel rail runs at constant pressure. This is slightly higher than the standard Mk2 regardless of the pressure in the manifold. So this change in setup leads to a slight deviation in the build manual. This can also cause issues if you are looking to turbo the engine later on. Mainly due to the boost pressure potentially affecting the manifold pressure. Although as I understand it this is probably only an issue if you are running serious levels of boost. One option is to change the fuel rail for the Mk2 version and add the return line to the fuel tank. Something to consider if you are trying to future proof your build.
Checking Car Details
I used mainly Facebook Marketplace and eBay to search for MX5s as I was looking for cars sub £1,000. Most people don’t want to pay the fees for somewhere like Autotrader for cars at this price. I did keep an eye out on pay to advertise websites as well but very little came up.
One thing I found, particularly on Facebook Marketplace was often there was very little detail in the advert. Some did not even say what the engine size was or if it had a valid MOT. This is where I found a couple of website links useful for info.
- Gov Vehicle Checker – Check the status of tax and MOT as well as engine size, date of registration, emissions etc.
- Gov MOT Checker – details of MOT history and any current advisories.
I then found an even more useful app called Vehicle Smart. It is available on the Android Play Store and the Apple App Store for free. It combines both of the websites above into a handy app on your phone. You can check vehicle details and MOT history by simply entering the registration number. It allows you to save vehicles to your ‘Garage’ to come back to later. You can even pay for a full vehicle history check from the app if you want. Compared to other Car History Check websites, the cost is competitive.
What to Look For
I was after a car that still had a valid MOT so I could drive it home. I didn’t want to have to hire a trailer or pay for delivery which would have cost more than the money saved by going for a non-runner. The optimum car in my mind was one that had a valid MOT and was safe to drive but was unlikely to get through the next without work. This would keep the purchase cost down but would mean I could get it home without the hassle.
MOT Advisories
An important thing to check is the MOT history and look for advisories. If you see an advisory for rust on the sill or chassis rails then there is a very good chance it won’t get through the next MOT. So a good angle to use when negotiating the price. Rust is normally the downfall for a lot of MX5s, particularly on the rear sills and the chassis rails.
This is what my rear left sill looked like before I started poking it.
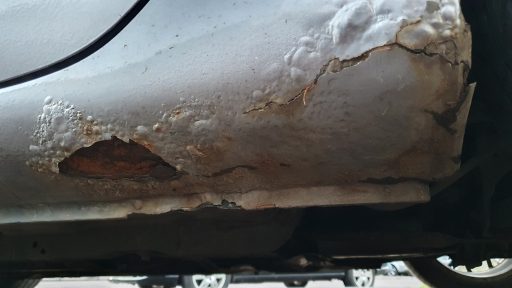
I was interested to see how bad it really was. This is what I was left with after some gentle tapping with a hammer and poking with a screwdriver.
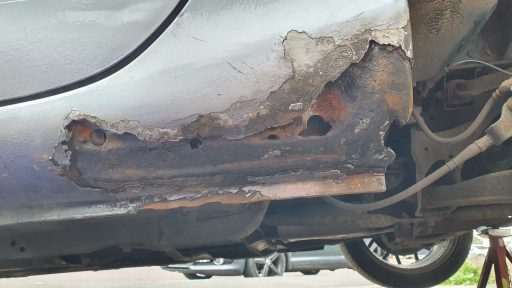
The general rule of thumb is if it is starting to bubble on the outside it is a lot worse on the inside. These photos highlight this point quite nicely. The car would require some serious work on both rear sills to get through another MOT. This rear sill area is very close to the bottom seat belt anchor point, which is one of the reasons it would fail.
With the shell being knackered but the mechanical elements being in good condition, it is actually a perfect scenario for a donor vehicle. The rest will be scrapped so you don’t need to worry as long as you can safely get it home.
Basic Parts Required
The MK Sportscars website has a detailed list of donor parts required for the build. The main items are:
- Engine and Ancillaries;
- Gearbox;
- Differential and driveshafts;
- Propshaft;
- All of the wheel hubs and uprights;
- Front Brakes*;
- Rear Brakes;
- Wiring including instrument cluster*;
- Fuel pump.
*unless you’re upgrading.
So if the car runs well with a solid engine and gearbox, but suffers from rust, you have the perfect donor.
Additional Extras
One thing that I think is often overlooked when looking for donor vehicles, is any extras that the vehicle has that could be sold once you have stripped the vehicle. If you have the patience and the temporary storage room, there are lots of bits on the car that you don’t need that are worth something. I am quite sure I will get more than I paid for the car in return for the bits I sell that I don’t need for the build. This will give me essentially free donor parts for the build.
Bear this in mind when buying the car if you want to get the best value build. It might be worth paying a bit more for the car if the parts you can sell are worth more afterwards. For example, the Mk2.5 heated leather tombstone seats are selling on Facebook Marketplace for anywhere between £80-£200 for a pair, depending on the condition. In comparison, standard cloth seats would only get £50-£60 for the pair. So it is probably worth paying a bit more for the car if it has leather seats as you are likely to be able to get this back later on.
Parts to look out for
Here are a few things to look out for which could be worth paying a bit extra for the car because of the resale value of the parts:
- Heated leather seats;
- SVT or special edition alloy wheels;
- Hardtop – these are worth £300-£400 alone in good condition;
- Aftermarket coil-overs;
- Aftermarket stainless steel back boxes;
- Catalytic converter – some of these are worth several hundred pounds in scrap value. This is due to the amount of precious metal such as palladium, platinum and rhodium used as the catalyst. Particularly if you still have an OEM one.
Buying Experience
The experience of buying a donor car is quite different from buying a normal car. You focus very much on different priorities when searching for the donor and when you then view the car. You are less worried about cosmetic issues with bodywork or rust and you need to focus on the elements of the car you will be using for your build. For the MK Indy RX-5, this is mainly the mechanical components as described above. Don’t forget though you can still use cosmetic and rust issues to negotiate the price down even if you know they won’t affect your build! “Gosh, that’s going to cost a lot to get it through the next MOT…”
Safety First
A really important thing to consider when buying the donor vehicle is how are you going to get the vehicle safely home? This is important as you are likely to be looking at a car that either already is or close to being an MOT failure. If the car does not valid MOT then you don’t really have many options. You will either need to use a trailer or car transporter to get it home. Alternatively, there are plenty of vehicle delivery services available. These can collect and deliver the vehicle to you but these all come at a cost. This might negate any savings you make on buying a non-runner in the first place.
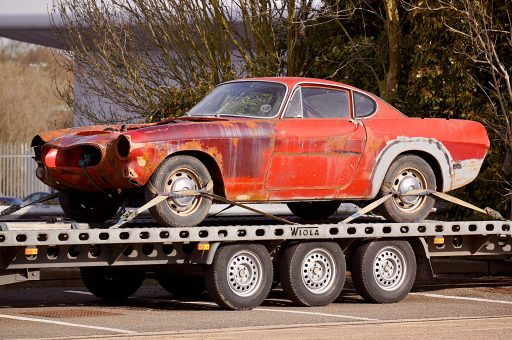
This is why I specifically wanted a running vehicle with a valid MOT. To make it easier for me to get the vehicle home. You need to still be cautious going down this route though. A car that has a valid MOT doesn’t necessarily mean it is safe to drive. It might have a valid MOT but has sat on a driveway rotting for 10 months not being used. You need to take care to inspect all the key safety features before getting behind the wheel. This is where it is important to ask the right questions to the seller. You need to build up a full picture of the history before you even view the car.
Paperwork and Boring Stuff
Now for the teaching granny to suck eggs stuff… Don’t forget that if you are driving the car home that you insure it and tax it before you drive away. I simply had an insurance quote ready to go and activated it online once we agreed on the sale. Tax is very simple to set up online on your phone also. Before you drive away check the fuel gauge and ask how accurate it is. Mine looked like it had 1/4 of a tank when I left but after a mile, it dropped dramatically. This lead to an unexpected diversion via the petrol station.
As ever it is important to get all the V5 documents processed and get a receipt for the vehicle. I simply used the AA Seller’s Contract. These will be really important when registering the new vehicle once it is built, so don’t cut corners here.
My Donor Vehicle
So the car I ended up buying is a 2004 Mk2.5 Euphonic special edition with the 1.8l VVT engine. It comes with a torsion Limited slip Differential and has 102k km on the clock. It cost me £700 in November 2020.
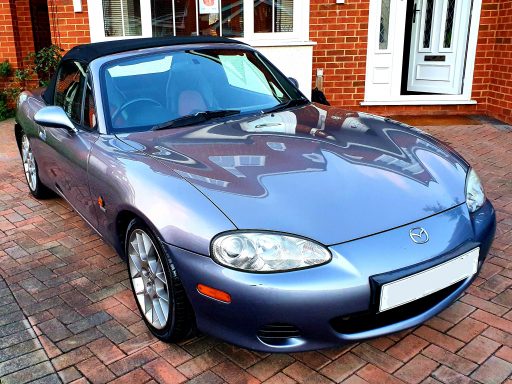
It looks in really good nick here but this is only because a good friend of mine is a car valet and couldn’t resist giving it a once over! The rear sills have bubbled badly and as you can see from the photos above would need welding to get it through another MOT. When I bought it there was 3 month MOT on it and mechanically it is very sound. A couple of tyres were right down to the wear limit on the edge, that was about the biggest issue. So I managed to safely drive it home.
I wasn’t happy with 2 of the tyres and I wanted to run the car over the winter until the MOT ran out. So instead of shelling out for brand new tyres it worked out cheaper to buy a full set of SVT with tyres on. I then paid the local garage to swap 2 of the good tyres into the Euphonic rims to give me more grip for the winter. The bonus here is that by doing up the SVT rims with a fresh respray (now all without tyres) and selling them on I should get more back than I paid for them and the materials. So essentially the tyre swap was free.
My Added Extras
Here are some of the good extra bits that came with the car that will help me to recoup costs for the build.
- Heated leather tombstone seats;
- Euphonic Alloy Wheels (now with reasonable rubber);
- Coilovers;
- Original Suspension coils/ dampers – they gave me these as well as they were only going to throw them out;
- Sony head unit and 6 disk changer;
Unfortunately the roof is not in brilliant condition as the stitching round the rear window has come unstiched. So this won’t be worth much.
Things to Fix
The only things I have noticed that will need attention when I strip and rebuild (over and above the normal) is:
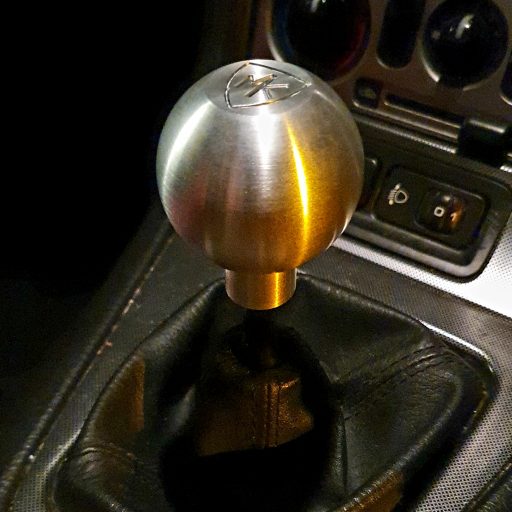
- Gear lever turret rebuild with new rubbers and joints. The gearshift is a bit sloppy and nitchy between gear 1 and 2. This is apparently simply fixed buy changing the rubber boot set for £40.
- The alternator has seized (common problem with Mk2.5 which have been sat around a while. This will need a full strip and rebuild or maybe a complete replacement. I’ll see once it is out.
Both of these I probably would have done anyway, so it’s not a big issue. Overall I’m very pleased with the donor vehicle I have ended up with.
Summary of Build Costs and Hours
Here is a summary of the costs and person hours (total number of hours for every person that has helped) for the build so far. This should hopefully help others with the planning of their builds, by providing cost and time actually incurred for this build. A more detailed breakdown of all the costs and hours worked on the build to date can be viewed here.
| Car Build Costs This Post | |
|---|---|
| Mazda MX5 Mk2.5 Euphonic Donor Vehicle | £700 |
| Mazda MX5 Additional SVT Wheels and Tyres (for the Tyres) | £65 |
| Totals | This Post | To Date | All Posts |
|---|---|---|---|
| Person Hours Worked | 0 hrs | 0 hrs | 404 hrs |
| Car Build | £765 | £765 | £13,202 |
| Tools / Consumables | £0 | £0 | £470 |
| Total Cost | £765 | £765 | £13,672 |
