
So I now have the Mazda MX-5 donor vehicle stripped and the main parts I need now ready for refurbishment. As part of the MK Indy kit car build there are several parts that need to be modified to make them suitable for the MK Indy chassis.
- Prop Shaft – reduction in length;
- Steering Column – lengthen and addition of the Ford quick rack connection;
- Sump/ Oil Pan (optional) – reduction in height of the sump/ oil pan by c. 40mm to provide greater ground clearance and shortening of the oil pickup tube;
- Differential (optional) – strengthening of the differential to future proof higher power.
MK Sportcars offer a service to carry out these modifications. I feel it is best to get them to carry out these changes as they know exactly what is required. I was booked in to have a visit to MK Sportcars and a test ride in their RX-5 Turbo. So thought it was a good opportunity to take the parts up with me and save on some postage. Here is an overview of what I did to prepare the parts for modification.
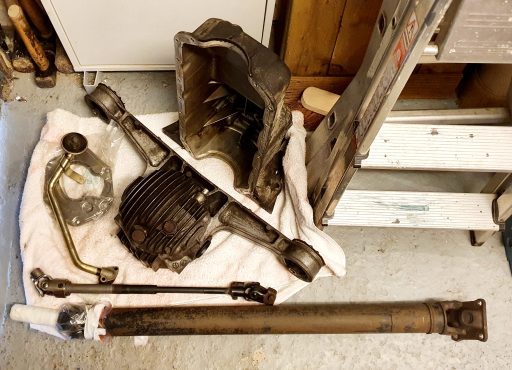
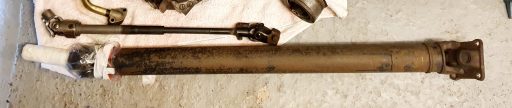
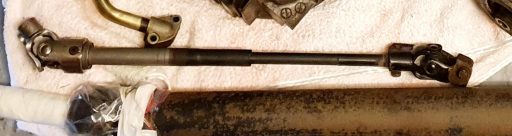
Prop Shaft
So the prop shaft is the connection between the gearbox and the differential. When the engine and gearbox and the differential are mounted into MK Indy RX-5 chassis they are closer together than in the Mazda MX-5. So the prop shaft needs to be shortened to fit.
MK Sportscars offer this as a service where they cut and re-weld the Propshaft to the correct length then rebalanced the shaft. Whilst other companies could do this, maybe local to me, I figure it is best to get MK Sportscars to do this. They have done it many times before and will definitely get it the correct length.
There is very little to do to prepare the main prop shaft for modification once it has been removed from the car. I gave the prop shaft a good clean and wrapped some cloth and bag around the spline end to protect it and that was it.
Steering Column
The steering column from the Mazda MX-5 comes in 2 main sections. The upper section connects to the steering wheel and goes through the bulkhead/ firewall. This is straight with no universal joints. The lower section connects onto the upper section with a universal joint. It then goes down to the powered steering rack where it connects with another universal joint.
In the MK Indy RX-5, the steering column needs to be extended as the nose of the RX-5 is a lot longer than the MX-5. It also needs to have a Ford universal joint added to mate with the Ford Escort Mk2 non-powered quick rack. This again is a service that MK Sportscars offer and know exactly what needs to be done.
Like the prop shaft, there is very little to prepare the steering column for modification once it has been removed from the car. The main thing to note is that you only need the bottom part of the steering column to be modified. The top part that connects to the steering wheel does not change. I simply gave it a good clean.
Sump/ Oil Pan
So the original sump/ oil pan for the Mazda MX-5 protrudes about 40mm from the chassis floor when the engine is mounted in the RX-5 chassis. This makes it the lowest point of the car and vulnerable to speed humps and similar. This is more of an issue if you are also running 13″ wheels where the ground clearance reduces further. So it is a good idea to get the sump reduced in height to be flush with the chassis floor. Luckily MK Sportscars offer this as a service.

So the sump/ oil pan needed a bit more work to make it ready for modification. For one, it was still mounted to the engine… then it needed a good clean.
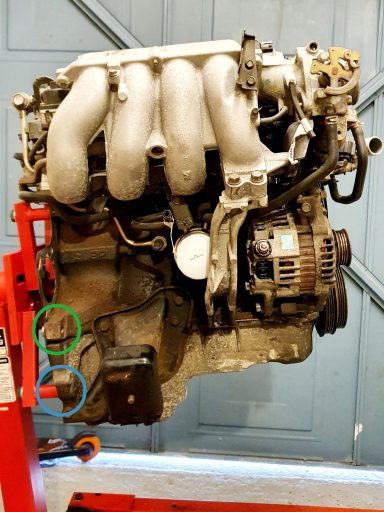
Engine Stand Mounting Points
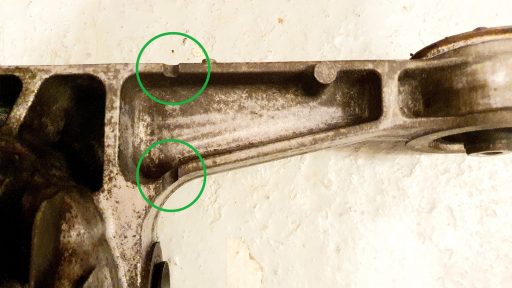
So the first thing I needed to do was to reposition the bottom engine mounting points on the engine stand. As you can see from the image I had attached them as far down as they would go which happened to be into the oil pan (blue circle). I needed to reposition them to the bottom of the engine block (green circle).
This was reasonably straightforward but did involve me having to get the engine hoist out again to take the weight while I shimmed the 2 top mounts with washers. This was due to the new bottom mounts not being flush with the block.
Engine Mounts
The next job was to remove the engine mounts from either side of the engine. These are very simple to unbolt. They are also not required anymore for the installation into the very latest MK Indy RX-5 chassis (Jul 21 onwards). MK has made the chassis mount universal to take multiple engines. They then use a separate adapter bracket depending on the engine. This has made the chassis modular and more adaptable.
Oil Pan Bolts
The final job was to undo the many oil pan bolts which hold the oil pan to the engine block. Just when I thought I had them all I noticed 2x additional long bolts that go from the bottom of the bell housing, through the oil pan and into the engine block. Don’t forget to remove these!
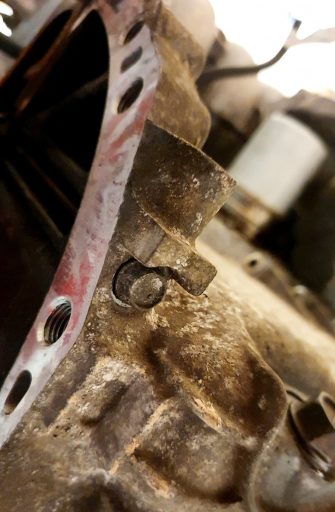
With all the bolts out, the pan needed a bit of gentle persuasion to release the seal. I used a wooden block and a club hammer to tap around the edge of the pan to loosen it. Eventually, it came free.
With the oil pan off, there was one thing left to do. To take the oil pickup tube off as this also needs to be modified. The length of the tube needs to be shortened to fit in the lower profile sump. MK Sportscars have a jig for doing this and offer this as part of their sump shortening service.
I then gave the pan and oil pickup a good clean and degrease ready to take to MK Sportscars.


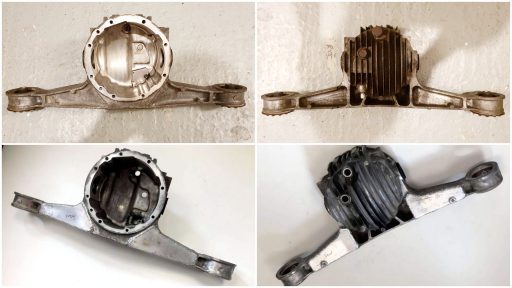
Differential Housing
The differentials in a Mazda MX-5 are designed with a couple of notches cut out of the casting. As I understand it this is to help provide better crash protection. It helps the differential break if there is a rear-end collision.
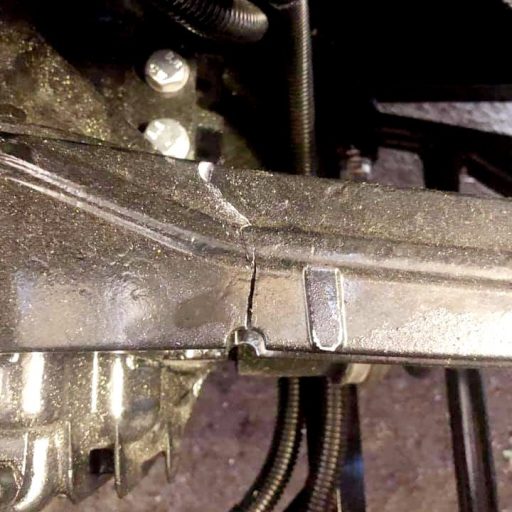
In normal applications this is fine, but when you install the same differential in an MK Indy (or similar) it potentially can break through normal use. Now, this is more of a problem if you are running higher than standard power or extra-wide slicks. I have seen instances reported of this happening on standard power and tyres, like below.
So to overcome this weakness, MK Sportscars offer a service to strengthen the differential by welding additional plates onto the aluminum housing. The differentials are then good for +300hp at the wheels, like their RX-5 Turbo demonstrator car.
Now for my build, I’m not going for big power straight away. I plan to use the stock Mazda ECU running at the standard 146hp initially for IVA. But I want to future-proof the car now to make upgrades later easier. So in my view, it makes sense to add additional strength on Day 1 while I’m building the car. Particularly as I have the more costly to replace LSD it seems worth it.
Stripping Down the Differential
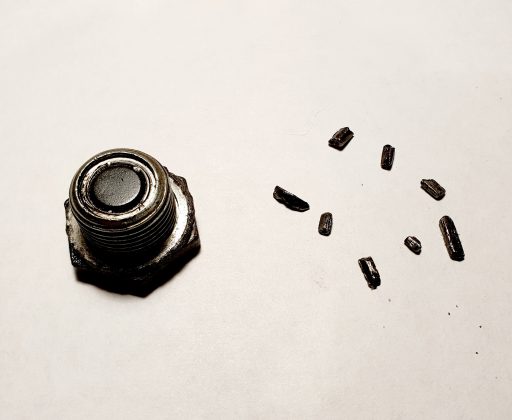
MK Sportscars only need the aluminum casting for the strengthening so it was time to dismantle the differential. This is a fairly straightforward process. First, make sure all of the oil is drained out if you haven’t done this already. When taking the magnetic drain plug out I found the following bit of metal attached to it. From doing a bit of research on the internet I found that seems to be a common thing with the Mazda Fuji Limited Slip Differential like mine. It doesn’t appear to affect the operation of the differential. Only time will tell…
There are a bunch of 10mm head bolts to undo around the joint between the aluminum and the steel casing. The casing can be separated at the seal with a bit of gentle persuasion once the bolts are all removed. I used a wooden block and a club hammer onto the block to gradually separate the seal. Eventually, it came apart and I could lift the main differential half to one side. Warning – the differential oil really stinks and you get quite a waft when it comes apart. I wrapped the half I didn’t need in a plastic bag to get rid of some of the smell.
Cleaning the Differential Casing
I then cleaned the casing internally first with some engine degreaser initially. Then I mixed up some warm water and some washing-up liquid in a spray bottle. I used that to do the remainder of the cleaning. This was quite effective. I also used this on the external casing with a toothbrush to help agitate the surface. Then I wiped down the surfaces with a clean rag. I was quite pleased with how the casing came out in the end. It will need further cleaning a preparation work before I repaint it later on. But for now, it is good enough to take to MK Sportscars to allow them to strengthen the casing.


Video of the Preparation
Summary of Build Costs and Hours
Here is a summary of the costs and person hours (total number of hours for every person that has helped) for the build so far. This should hopefully help others with the planning of their builds, by providing cost and time actually incurred for this build. A more detailed breakdown of all the costs and hours worked on the build to date can be viewed here.
| Person Hours Worked This Post | |
|---|---|
| Remove Sump and Differential Housing for modification by MK Sportscars | 7 hrs |
| Totals | This Post | To Date | All Posts |
|---|---|---|---|
| Person Hours Worked | 7 hrs | 161 hrs | 363 hrs |
| Car Build | £0 | £225 | £12,342 |
| Tools / Consumables | £0 | £237 | £459 |
| Total Cost | £0 | £462 | £12,801 |
Hi Dave
I could not find any details in the MK Donor document regarding using the ECU
Sorry for the extremely late reply. The ECU from the donor vehicle is needed if you are not planning on using a 3rd party ECU. The manual is geared toward the re-use of the MX5 ECU and wiring loom for the build. For my build I will be usng the MX5 ECU and wiring loom.